Access RefWorks at https://refworks.proquest.com

Creating a RefWorks Account
- Using an email and password via the RefWorks website.
- Using an email and password via a unique link provided by the institution.
- Using institutional credentials/Single Sign-On (SSO).
Creating an Account Using Email and Password
Accounts can be created on RefWorks website using an email and password. To create an account via a unique link from institution, using email and password, see here.
Create an account on the RefWorks website
If RefWorks is not enabled, contact an administrator about RefWorks access.
Type in a password and click Sign Up.
RefWorks sends an activation email for verification. Open the URL in the email.
Enter login credentials and follow the on-screen instructions to complete registration. Follow on-screen steps to complete account creation.
RefWorks Password Requirements
To ensure security, RefWorks password complexity requirements are:
- One uppercase character
- One number
- One special character ~! @#$%^&*_-+=|(){}[]:;,.?/\
- Password length must be at least 8 characters
- Password must be different from last 3 passwords
- Passwords expire in 180 days
Passwords may be changed in user Settings page. From the user menu at the top right click on Settings, scroll down to Password and click on Change password.
Create an account from a unique link
Click the link that the institution provided by email or on their website.
Enter a unique access code provided by an administrator and click Check.
Enter email address and a password. Click Sign Up.
RefWorks sends an activation email for verification. Open the URL in the email.
Enter login credentials and follow the on-screen instructions to complete registration.
Create an account using Single Sign-On (SSO)
On the Refworks website login page, click on Use login from my institution and select institution from the list.
Or, click on OpenAthens Credentials to search for institution in OpenAthens.
Users already logged in to institution's network are directed to the Start using RefWorks page.
Users who are not logged in to institution’s network are directed to institution’s login page and should proceed to log in.
If an institution does not appear in the list, this means SSO is not enabled for that institution and account should be created using an email and password.
Remove Single Sign-On (SSO) for an Account
Log in to RefWorks.
Click on Settings in the user menu. Scroll down to Institution Credentials and click Remove Credentials.
Link Institutional Credentials to an Existing RefWorks Account
Log in to RefWorks with email and password
Go to RefWorks website
Type in email address and password and click Sign In.
If a password cannot be recalled, click on “Forgot your password?” on the login page.
A password reset email containing a reset link will then be sent.
Log in to RefWorks with institutional credentials (Single Sign-On)
Users not logged into institution's network, are directed to the institution's login page. After logging in to institution, users are automatically logged into RefWorks.
RefWorks User Interface
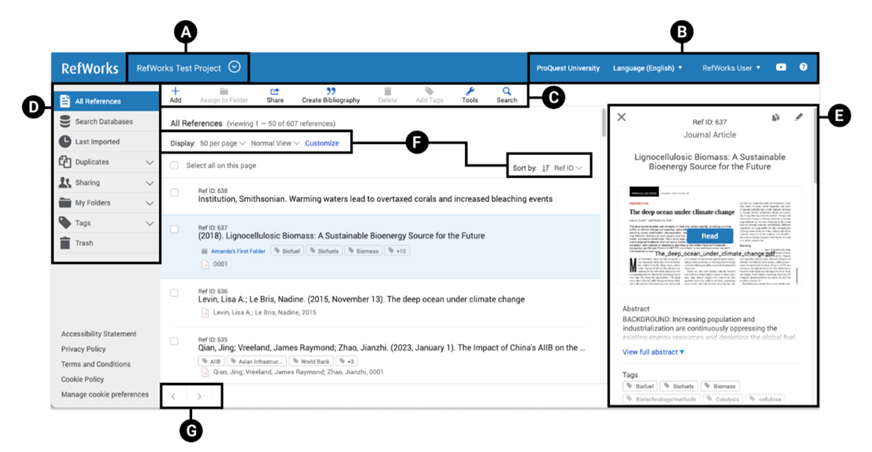
RefWorks user interface contains:
-
A: Projects
Projects allow separate reference collections to be maintained for different research efforts. -
B: Utility Toolbar
Includes institutional information and link, when enabled by Admin, language menu, user menu, and help menus. -
C: Reference and Tools Actions
Includes the main menu with various features:- Add – Opens a menu with the following actions:
- Upload document – Browse computer's files for a file to upload to RefWorks as a reference.
- Create reference manually - Type in, or copy and paste, reference details. User autofill feature to find and populate details using title, ISSN, ISBN or DOI.
- Import references from
- Word of PDF - Import references found in a list in Word or PDF
- Other file types – Upload a reference file previously exported from database, another reference management service or authorize a direct import from Mendeley.
- Assign – Add or remove the currently selected reference(s) to or from folders, or assign to another Project by copying to another Project. This can also be used to add a local copy of a reference in a shared folder to list of references. A single reference can be in multiple folders.
- Share – Opens a menu with the following actions:
- Share folder – Share references in a folder with other users.
- Move folder - Move folder, and its references to another Project.
- Copy folder - Copy folder, and its references to another Project
- Export references – Export references to computer's file system.
- Export attachments - Export attached files to computer's file system.
- Bibliography – Opens a menu with the following actions:
- Create bibliography – Create a formatted bibliography of references to copy and paste.
- Quick cite – Create citations in RefWorks to copy and paste.
- Citation style editor – Create and manage reference citation styles.
- Delete – Opens a menu with delete options which are enabled or disabled depending on the tab currently in view.
- Remove from Folder – Available when in Folder; Remove references from the folder but do not move them to Trash.
- Move Selected to Trash – Available in All References, Last Imported and Folder. Move references to Trash.
- In Trash Folder:
- Delete selected (#) – Permanently remove selected references.
- Delete all (#) – Permanently remove all references in Trash folder.
- Restore – Available in Trash Folder only – Restore deleted references to previous location and remove them from the Trash folder
- Add Tags – Add tags to selected references.
- Tools – Opens a menu with the following actions:
- Find duplicates – Find and remove duplicate references.
- Bulk edit - Perform bulk edit operations on references.
- Manage folders - Access page for easy folder navigation and management.
- Plagiarism & AI content checker - Available when enabled by institutional Admin; Online plagiarism and AI content detection tool.
- Preflight Pre-Submission Check - Available when enabled by institutional Admin; Tool to scan manuscripts for technical compliance and language quality.
- Extensions & Add-Ons - Tools and information about Save to RefWorks and writing tools integrations.
- Search & Advanced Search – Search references, notes and text in attached PFDs.
- Add – Opens a menu with the following actions:
-
D: Reference Organization
This sidebar contains tabs that provide quick access to references. These tabs are:- All References – All records available in RefWorks library except those in Trash folder.
- Search Databases – Available when enabled by institutional Admin; Open a search area to discover items in external databases.
- Last imported – References added within the last 30 days. References imported prior to last 30 day are no longer visible in this tab.
- Duplicates– Find and remove duplicate references. See last results of most recent duplicates search.
- Sharing – Shared folder(s), accept or refuse an invitation from another user, or view folders available in institution.
- My Folders – References by folder, including those that are not assigned to any folder, in current Project. A single reference can be in multiple folders. Also enables to add and manage folders.
- Tags – Search for tags and list of tags. A single reference can have multiple tags. A tag is created when added it for the first time to any reference, or if it is assigned to a reference in a shared folder. When importing references, tags can be imported, or omitted.
- Trash – Deleted references. RefWorks does not clear Trash folder automatically. References deleted from this tab are permanently removed and cannot be recovered.
-
E: Reference Details/Reference Editor
Manually create a reference, create or update a reference by using autofill feature, view, edit or duplicate the reference that is currently in focus.- Reference Details/Reference Editor pane is hidden unless a reference is in focus, or when a reference is being created.
- When configured by institutional Admin, a link appears on the reference details view and in reference editor, with Full-text or partial access to the reference within institutional library or on an external site. This is commonly known as Link Resolver.
- When available and enabled by institutional Admin, Find menu options appear: PubMed, Crossref lookup, Unpaywall, search: Related PubMed articles, More by author in PubMed, Google Scholar, DOI. Unpaywall link appears for references where DOI is present and located in the Unpaywall database. Depending on reference in Unpaywall, link will offer a new webpage with information or start PDF download.
- Related articles, if enabled by institutional Admin - available only for Ref Type: Journal Article; view and import recommended articles.
- Attachments: when multiple attachments are present, scrolling is enabled.
- When the reference has a full text PDF attachment Read link is visible to read the PDF in a reader.
- When the reference has a non-PDF attachment, Download link is visible.
-
F: Display Options
The following display options are available:- Display: number of references per page; limited to 2000.
-
View: Type of view used for the page.
- Normal - common view of reference information.
- Table - view references in a table format.
- Full - see reference details without opening reference preview panel.
- Citation - see references formatted according to chosen citation style, with visual indicators where detail(s) may be required, but populated.
-
Customize: What to display/hide on the page. Applies to Normal and Full views only.
- Folders - see which folders references are assigned to; folder tiles are links to folders.
- Tags - see what tags are assigned to reference; tag tiles are links to search for references with tag assignment
- Sort order: Ascending or Descending
-
Sort by: Define what data to sort on.
- Date added
- Date modified
- Date published
- Title
- Author
- Ref ID
-
G: Pagination Buttons
Enables navigation between the pages.
Managing RefWorks Account
Configuring Basic Information
User interface language – Select the language in the menu on Utility toolbar.
New features are developed in English. It may take time before their labels are translated to other languages.
User menu/Settings - Click on Settings under user menu dropdown on the Utility toolbar.
First and last name; not required.
Area of Focus - Used by institutional Admin when viewing analytics; not required
Role – Used by institutional Admin when viewing analytics; required
Email - Used for log in, invitation notifications and password reset emails; required.
Dropbox - Connect to Dropbox to automatically save copy of attachment(s).
Custom fields – Configurable for all references and are available when manually adding or editing a reference. Can also be added while manually adding or editing a reference. Also used in advanced search.
Institution Credentials - when Single Sign-On is configured by institution, authenticate to RefWorks account without setting up a password in RefWorks.
Password – used to log into RefWorks; not required if Single Sign-On is enabled.
Personal data - Request to see what personal data is associated with RefWorks account.
Remove account - Delete account, all personal data, references, and documents will be permanently removed. This action cannot be undone.
Configuring Synchronization with Dropbox
When enabled by institution, attachments can be copied to Dropbox, RefWorks automatically makes copies of uploaded attachments in linked Dropbox account. Removing citations or attachments from RefWorks also removes them from Dropbox.
On the Settings page (select Settings from the user menu on Utility toolbar) select Connect from the Dropbox section.
Follow on-screen instructions to complete the configuration. Grant RefWorks permission to create a folder in Dropbox called ProQuest RefWorks in Apps folder. This is where RefWorks places copies of attachments.
Link to Dropbox can be removed at any time. Removing the synchronization does not remove any items that are currently in Dropbox account.
Configuring Synchronization with My Research
Reviewing Personal Data Stored by RefWorks
Review all personal data that RefWorks stores, select Send me my personal data on the Settings page. Request to see what personal data is associated with RefWorks account
Deleting RefWorks Account
To delete RefWorks account, select Remove my RefWorks account on the Settings page. Select Remove Account in the confirmation dialog box. This action cannot be undone.